Your first shot
From a pinned target on the map table to a shell in the air. Read the bearing and range, look up the solution, lay Old Marta and pull the lanyard.
The radio has given you a target: an MG nest at the crossroads in grid C4, pinned on the map table. It is more than 11 km away, past the fog, and you will never see it from the gun.
This tutorial follows the current design and will be rewritten against the game when aiming and firing are built. You will need: one pinned target on the map table, and The shot if the loop is new to you.
Steps
- Click the target. On the map table, the bearing ruler runs from Old Marta's siding to your cursor. Click the MG nest to pin it, and read bearing, then range: 047° · 11 420 m. If you are in the gun yard, press Tab (gamepad Select) first.
- Choose the charge from the range rings. The rings around the gun show the farthest each charge reaches: 6, 10, 14 and 18 km for 1 to 4 bags. The target lies between the 10 km and 14 km rings, so 3 bags is the smallest charge that reaches it. More bags only add smoke, reload time and exposure.
- Look it up in the firing table. Find 11 420 m for 3 bags: elevation 31.4°, flight time 38 s. Right-click the row (gamepad Y) to pin it to the gunner's notebook. Early in the campaign this is also a crew moment: you are teaching Fenn to read the table.
- Switch to the gun. Press Tab (Select). The view drops through the clouds into the clay gun yard. The notebook and the radio log come with you.
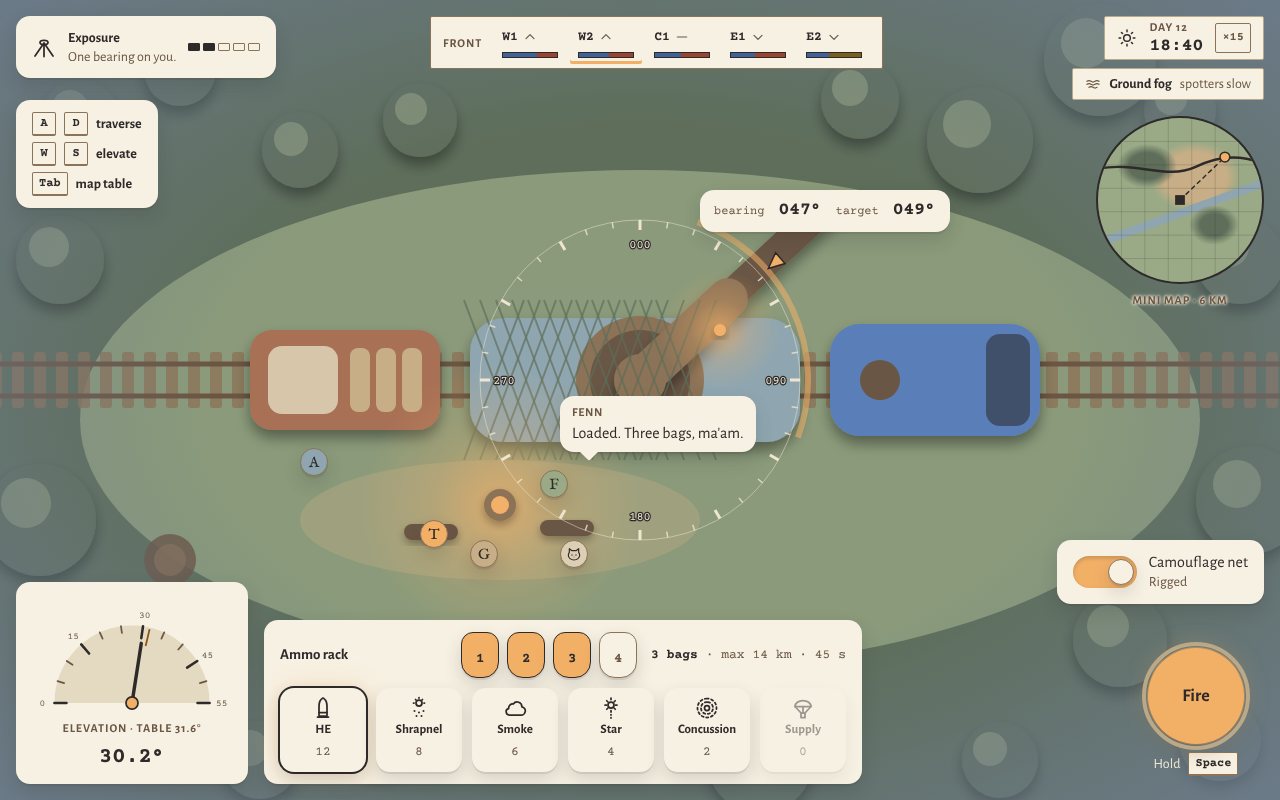
- Traverse to the bearing. Hold A or D, or drag the barrel (left stick). The heavy turntable turns about 6° a second. Stop the needle of the bearing ring on the amber triangle at 047°.
- Raise the barrel. Press W or S, or scroll on the elevation dial (left stick). The dial's amber tick shows where the table wants the barrel. Close the gap until the value under the dial reads 31.4°.
- Choose the shell and the charge. Keys 1 to 6 pick from the ammo rack, always in the same order: HE, shrapnel, smoke, star, concussion, supply. Press 1 for HE, then step the charge to 3 bags with Q and E (gamepad: D-pad). The charge selector confirms it: 14 km at most, 45 s at full range, a spread of 110 × 35 m.
Loaded. Three bags, ma'am.
- Pull the lanyard. Hold Space (gamepad A) for one second. Let go early and the ring around the lanyard starts again. Recoil shakes the yard and a smoke ring rolls across the siding.
- Wait out the quiet moment. For 38 s there is nothing to do. Fenn counts the seconds, the crew pours tea, Pip watches the sky. Press Tab to follow the shell's marker on the map table until it slips into the fog.
- Read the impact report. A rumble arrives, late and far away, then the radio. If a spotter, balloon or plane can see the spot, about 150 m around the impact turns live for 15 s, and the shell's numbered marker carries the spotter's reading.
Drop 100.
Fenn: that one went long, ma'am.
A first shell 100 m long is a good start. The next tutorial, Bracketing a target, turns that call into a hit.
What to watch for
- The wrong charge. The table gives a different elevation for each charge. If the charge selector does not say 3 bags when you pull the lanyard, the shell lands somewhere you did not plan.
- Letting go too soon. The lanyard needs the full second, and it waits while Fenn is loading.
- Blind shots. You may fire into fog, but if nobody sees where the shell lands, its marker shows a number and no reading. See Recon: spotters, balloons and planes.
- Too much at once. P pauses and Shift runs the war at half speed (gamepad Start). The Gunner's assist option fills in the whole firing solution if you want the battlefield without the arithmetic: see Accessibility.
Practise it
Pick another pinned target, this time inside the 10 km ring, and solve it yourself: ruler, rings, table, then the gun. With 2 bags the table gives a different elevation and a shorter flight. If your difficulty setting lets the notebook suggest solutions, work yours out first and compare. For the reasoning behind the table, read Ballistics and the firing table and Charges and range.