Bracketing a target
One long, one short, then split the difference. How to read a spotter's correction and walk your shells onto a target in two to four shots.
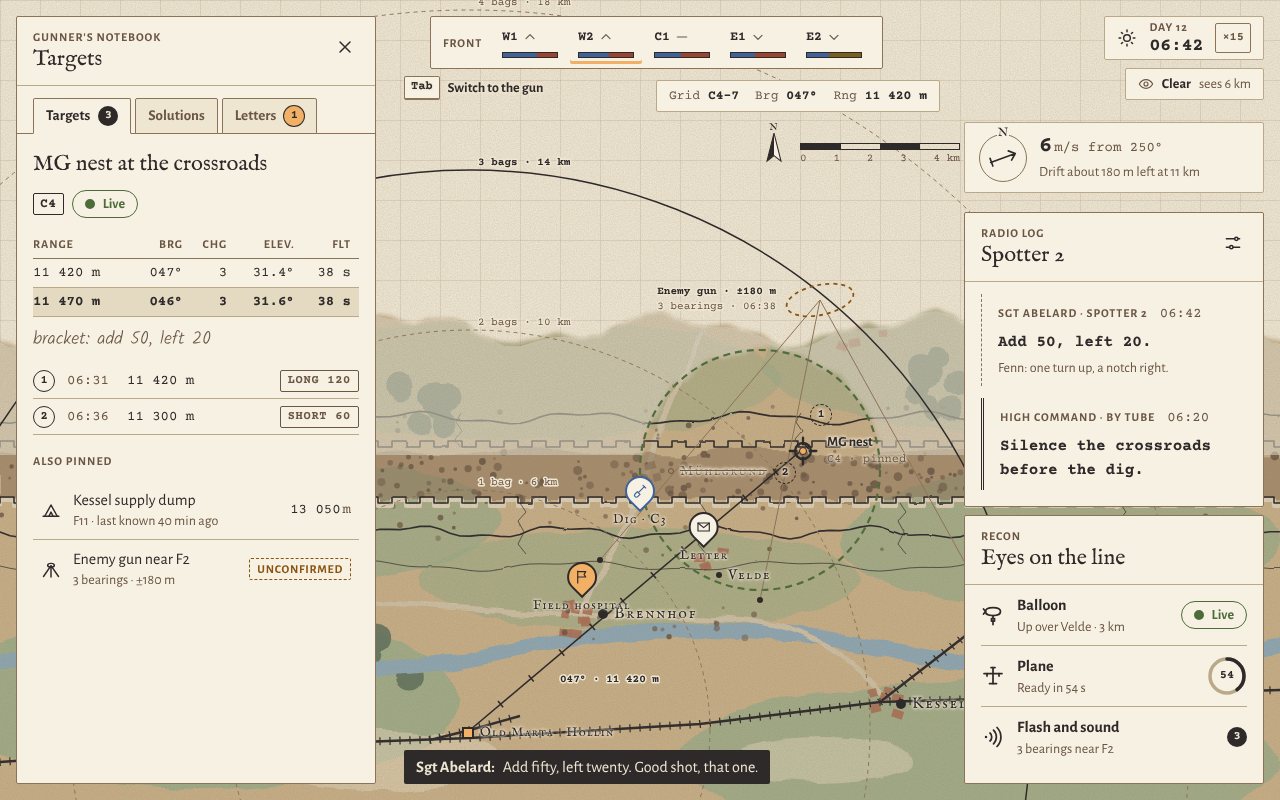
Your first shell at the MG nest at the crossroads landed long. That is normal. Over 11 km the spread of the shot and the wind add up, so gunners do not wait for luck: they bracket the target, one shot long, one short, then split the difference.
This tutorial follows the current design and will be rewritten against the game when spotter corrections are built. You will need: one observed shot at a pinned target, as in Your first shot.
Steps
- Read the call. The spotter tells you what to change for the next shell, not where the last one fell. Add means further, drop means shorter. Left and right move the next shell sideways. All of them are in metres.
Drop 100.
Fenn: that one went long, ma'am.
- Pin the correction. Right-click the radio line (gamepad Y) to pin it to the gunner's notebook. The correction pad there takes range as Add or Drop and line as Left or Right, in steps of 10 m or 50 m, and shows the new range and bearing in pencil before you apply it. Depending on your difficulty setting, it fills itself in from the last call.
- Fire one short. Apply "Drop 100": 11 420 m becomes 11 320 m. Look up the new elevation in the firing table for the same 3 bags, lay the gun again and fire. You already have one long; now you want one short.
Add 50, left 20.
Fenn: split the difference, ma'am.
- Split the difference. One shell fell long from 11 420 m and one short from 11 320 m, so the target lies between them. Halfway is 11 370 m, which is exactly what "Add 50" asks for. Left 20 moves the bearing a fraction of a degree; the correction pad works it out for you. Look up the elevation, lay the gun and fire.
Target. Fire for effect.
- Fire for effect. The solution is right. Keep firing on it without changing anything until the target is done. The shot log in the notebook lists every shot at this target with its reading, so the pattern reads at a glance: long, short, target.
What to watch for
- Spread. Every shell lands somewhere inside a small ellipse that is longer in range than in width. With 3 bags at full range it is about 110 × 35 m. Two shells fired with the same solution do not land in the same hole, and most misses are long or short rather than left or right. That is why most targets take 2–4 shots, not one.
- Wind. The wind board, top right in both views, gives the wind "from" a bearing, its speed, and how far it will drift a shell at the current target's range. Distance magnifies everything: a 10 m/s side wind pushes a 12 km shot 150–250 m off. Wind drifts through the day and changes with the weather, so an old correction may no longer hold.
- Add and drop the wrong way round. Add is always further from the gun, drop is always nearer. Swap them and your next shell lands further off, not closer.
- No observer, no correction. Only impacts a spotter, balloon or plane saw get a reading. A blind shot shows its number on the map and nothing else, and the shot log marks it "Unobserved". Get eyes on the target first: see Recon: spotters, balloons and planes and Fog of war.
- The hints fade. Early in the campaign each call comes with a hint that suggests the fix. As you learn, the hints stop and you work it out yourself.
Practise it
Find a pinned target inside the balloon's live circle, 3 km around its winch, so that every shot gets a reading. Bracket it on purpose: fire the first shell long and the second short, then split the difference. If the third shell lands on target, the shot log reads long, short, target. Then try it again on a windy day, and watch how the drift on the wind board shows up in the spotter's left and right. For how the table and the spread come out of the ballistics, read Ballistics and the firing table.